After Twin Pines experts divulged their favorite pumpkin design ideas last week, your local family owned and operated landscaping and contracting company decided to take it a step further! We called upon the owner’s children, nieces, and nephews, to help us put these diverse pumpkin decorating methods to the test! Check out our step-by-step guide to making these pumpkin designs below, and let us know what you think in the comments!
Chalkboard Paint Pumpkin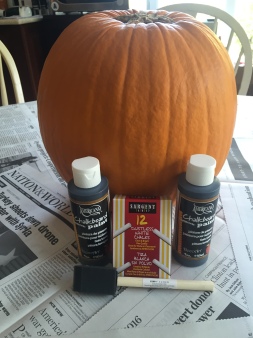
What You’ll Need:
- Pumpkin
- Chalkboard Paint (available at most craft stores)
- Chalk
- Paint Brush/Sponge Brush
- Paper Plate/Plastic Container
Steps:
- Gather all materials so they are easy to access
- Pour out some Chalkboard Paint onto a paper plate/plastic container (for easy access)
- Proceed to dip the paint/sponge brush in the paint and apply to pumpkin surface in thin layers
- Repeat until entire surface of pumpkin is covered and painted black, with no orange peeking through
- Let paint dry
- Use chalk to write on and decorate the pumpkin’s surface to you liking!
Expert Tips From Twin Pines:
- Use “Butter Chalk” in place of regular chalk for a much smoother drawing experience with much less mess! (This particular case was found at The Container Store!)
- Add some sparkles to the stem of your pumpkin for some extra glam!
Crayon Melting Pumpkins
What You’ll Need: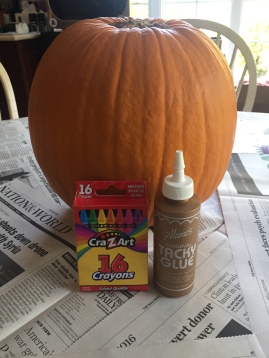
- Crayons in a multitude of colors
- Tacky Glue
- Hair Dryer
- Deep Cardboard Box
Steps:
- Choose the color crayons you want to include on your pumpkin
- Peel the wrappers off of those crayons
- Make thick stripes of tacky glue around the stem of the pumpkin
- Place crayons into the tacky glue stripes
- Let glue dry
- Place pumpkin into the deep cardboard box
- Plug in hair dryer and direct it towards the glued crayons (on high heat)
- Melt crayons one at a time, aiming the heat at the furthest end of the crayon first (the part not attached to the glue)
- Repeat steps for all crayons glued around the stem, until the colors are all flowing down the sides!
Expert Tips From Twin Pines:
- Warning: Use Caution while applying heat to the crayons. As the wax melts, it will splatter. This wax can be kept slightly contained by the deep box it is placed in, but should be monitored carefully during the craft.
- We saw better results using small pieces of thick crayons rather than full, thin crayons for this design. Picture 4 in the gallery below is the results when using the thin crayons, while Picture 5 is the results when using the thick pieces of crayons instead!
Glitter Pumpkins
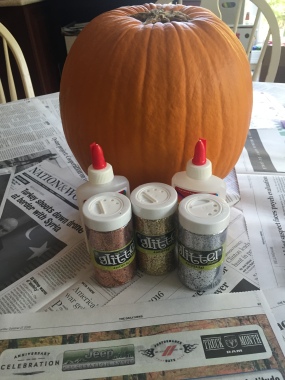 There are many different approaches to glitter pumpkins, but we decided to go with a candy-corn theme! Check out our steps below!
What You’ll Need:
- Glitter (Silver, Bronze, and Gold)
- Elmer’s Glue
- Paint Brush/Sponge Brush
- Paper Plate/Tray
- Paper Plate/Plastic Container
Steps:
- Place pumpkin on the paper plate/tray
- Pour out glue onto a paper plate/plastic container (for easy access)
- Dip brush in glue and apply it in a segment on the top of the pumpkin
- Shake out silver glitter against that top layer of glue so none of the pumpkins’ surface is showing through the glitter
- Let that section of glue/glitter dry
- Dip brush in glue and apply to a larger segment in the middle of the pumpkin
- Shake out bronze glitter against that middle layer of glue so that none of the pumpkins’ surface is showing through the glitter
- Let that section of glue/glitter dry
- Dip brush in glue and apply to the bottom segment of the pumpkin, which should be roughly the same thickness as the top section
- Shake out gold glitter against that bottom layer of glue so that none of the pumpkin’s surface is showing through the glitter
- Let that section of glue/glitter dry

Another option for glamorous pumpkin designs is to just glitter the stem of the pumpkin! This will add a pop of color to your pumpkin with very little mess!
Expert Tips From Twin Pines:
- Glitter is messy! Be sure to prep with newspapers around the base of the pumpkin before embarking on this craft.
- To avoid wasting glitter, you can switch out the paper plate below the pumpkin (which will catch excess glitter) between colors. Then siphon the extra glitter of each color back into its bottle.
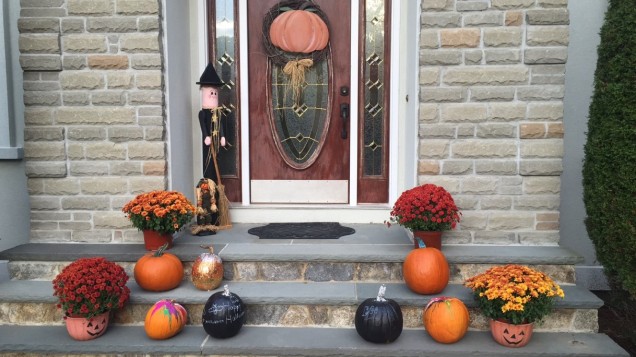
Try out these fun pumpkin decorating ideas yourself, then send us your final results (via Twitter, Instagram, Facebook, or via our website!) We will be sharing out favorite pumpkin submissions of the season in Twin Pines’ Pumpkin Patch on Facebook come Halloween!
(Check out last year’s here!)

One thought on “Perfect Pumpkins Part II – A Step By Step Guide To Twin Pines’ Favorite Pumpkin Decorating Ideas!”